
Laying up a carbon fiber stack is a critical step in the vacuum infusion process, ensuring that the carbon fiber fabric is properly arranged to provide optimal strength and structure to the final composite part. This short guide will walk you through the process of preparing and laying up carbon fiber for infusion, from initial mold preparation to fiber arrangement and finally infusion.
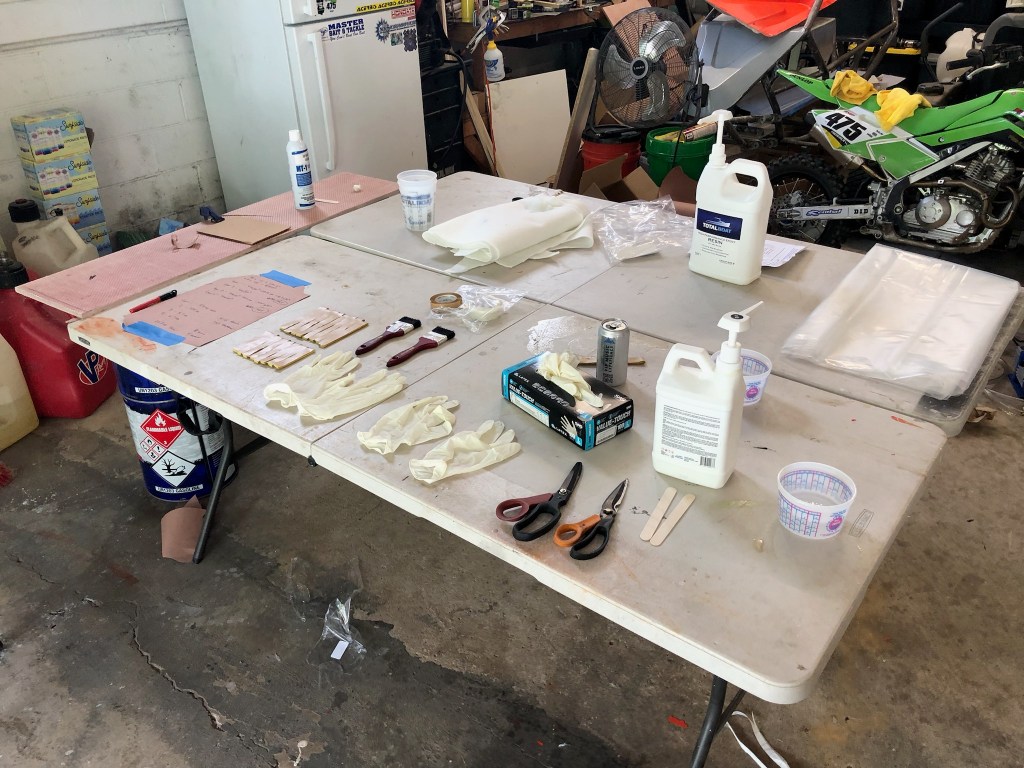
Materials and Tools Needed:
- Prepped Fiberglass Mold
- Mold release agent
- Carbon fiber fabric (typically woven or unidirectional)
- Peel ply
- Resin distribution mesh
- Vacuum bagging film
- Resin system (epoxy resin and hardener)
- Vacuum fittings and hoses
- Spiral tubing
- Scissors or rotary cutter
- Gloves
- Squeegee or roller
- Vacuum pump
The Process
Step 1: Prepare the Mold
The first and most important step is ensuring that the mold is clean and free from contaminants. Follow these steps:
Clean the Mold: Thoroughly clean the mold using a non-abrasive cleaner to remove any dirt, grease, or dust. Make sure there is no residue from previous parts.
Apply Mold Release: Apply a few coats of PVA or some generous layers of mold release wax to the mold. This ensures that the carbon fiber part can be easily removed once the resin has cured. Follow the manufacturer’s instructions for applying the mold release. For best results, apply a few layers and let each layer dry before adding the next.
Step 2: Cut the Carbon Fiber Fabric
Before laying up the carbon fiber, you’ll need to cut the fabric to fit the mold. Depending on the part’s complexity and design, you may need multiple layers of fabric.
Measure and Cut: Using scissors or a rotary cutter, measure and cut the carbon fiber fabric to fit the mold. Remember to leave some excess around the edges to ensure complete coverage. If you’re using multiple layers, cut each layer separately according to the required orientation (e.g., 0°, 45°, 90° for directional strength).
Prepare Fiber Orientation: If you’re using unidirectional carbon fiber, ensure the fibers are oriented in the correct direction. If using woven fabric, arrange the layers in alternating directions to maximize strength and rigidity.
Step 3: Lay the First Layer of Carbon Fiber
Position the First Layer: Start by laying the first piece of carbon fiber fabric into the mold. Ensure it lies flat with no wrinkles or air pockets. Press the fabric into the mold’s contours gently, but do not stretch it. Tip: A light mist of spray adhesive over your mold and/or your fabric can help keep the fabric from distorting.
Compacting: Use a squeegee or roller to gently press down on the fabric to remove any trapped air, ensuring that it conforms to the mold’s shape. You want to avoid compressing the fibers too much, as this can cause them to spread apart and affect the part’s structural integrity.
Check for Proper Coverage: Ensure the carbon fiber fabric covers the entire surface of the mold, including any complex shapes or edges. Make sure there is enough overlap around the mold’s edge to allow for the vacuum bagging process.
Step 4: Add Additional Layers
Repeat the process of cutting and laying up the fabric for each subsequent layer:
Layering: After the first layer is in place, add additional layers of carbon fiber fabric, following the same technique. Depending on the strength requirements of your part, you may need several layers.
Alternate Fiber Orientation: For added strength and rigidity, alternate the fiber orientations between layers (e.g., 0°, 45°, 90°) to optimize the mechanical properties of the part. For instance, a 0° layer will be strongest in the direction of the fibers, while a 45° or 90° layer will provide additional support in other directions.
Repeat Squeegee Process: After each new layer, use the squeegee or roller to remove trapped air and ensure the fabric conforms tightly to the mold.

Step 5: Add Peel Ply
Peel ply is a temporary layer used to ensure a clean, roughened surface for bonding or painting after the part is demolded. Once all carbon fiber layers are laid up, cut a layer of peel ply that covers the entire stack. The peel ply will create a rough, textured surface that will help with bonding or painting after the part is cured.
Step 6: Prepare Resin Distribution Mesh
If you are using a resin distribution mesh, place it on top of the peel ply layer before vacuum bagging. This mesh helps ensure an even distribution of resin throughout the stack.
Cut and lay the resin distribution mesh evenly on top of the peel ply layer. Ensure it covers the entire part, allowing resin to flow uniformly through the stack during infusion.
Step 7: Add Spiral Tubing (Optional)
For wide, long, or complex parts, keep in mind how the resin is going to flow in through the resin port and be pulled through the part towards the vacuum port. To ensure full resin coverage within the part, spiral tubing may be necessary. Place spiral tubing into areas to help resin flow or provide suction in areas that the resin might have a difficult time reaching otherwise.
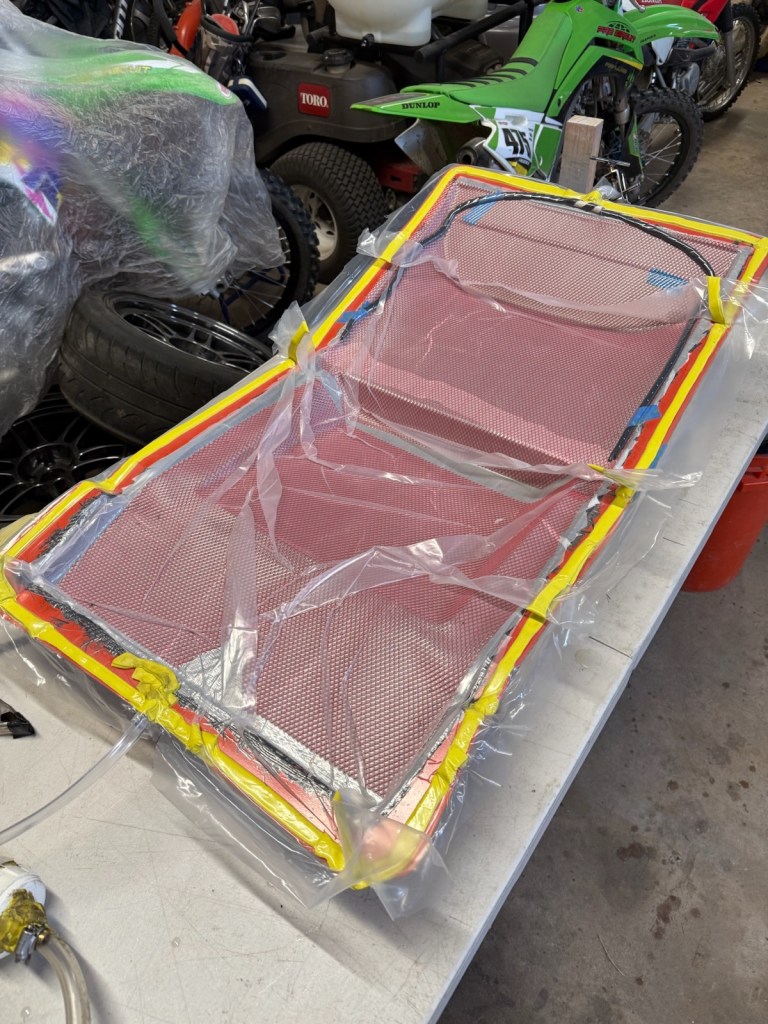
Step 8: Apply Vacuum Bagging Film
Now, you’re ready to set up the vacuum bag to pull resin into the carbon fiber stack during the infusion process. Cut a piece of vacuum bagging film large enough to cover the entire mold, allowing for overlap along the edges. The bagging film must completely enclose the part to create the necessary vacuum pressure.
Position the Film: Lay the vacuum bagging film over the entire stack of carbon fiber. Consider leaving pleats for complex curves or corners, so the bag can be drawn down tight in all areas and hold pressure against the carbon fabric. Be careful not to disturb the layers underneath.
Seal the Bag: Use vacuum bag tape to seal the edges of the film to the mold. Make sure the edges are sealed tightly to avoid air leaks. The vacuum bag should form a tight fit over the mold, with no gaps or loose areas.
Step 9: Add the Vacuum Port and Resin Port
For simple parts, cut two small holes in the vacuum bag at opposite ends of your part to pass tubing through (larger or more complex parts might require multiple ports to help resin flow across the part). One section of tubing will connect to your vacuum pump and the other will connect to a container with the epoxy/resin mixture. If using spiral tubing, connect the entry/exit tube to the spiral tubing with a “tee” connector. Ensure these pass through areas are sealed well with vacuum bagging tape; these ports are a common leak area, so take time sealing them up. There are quick release ports that make this process easier to manage, but take care in installing them as wrinkled vacuum bagging material can cause leaks that are difficult to pinpoint.
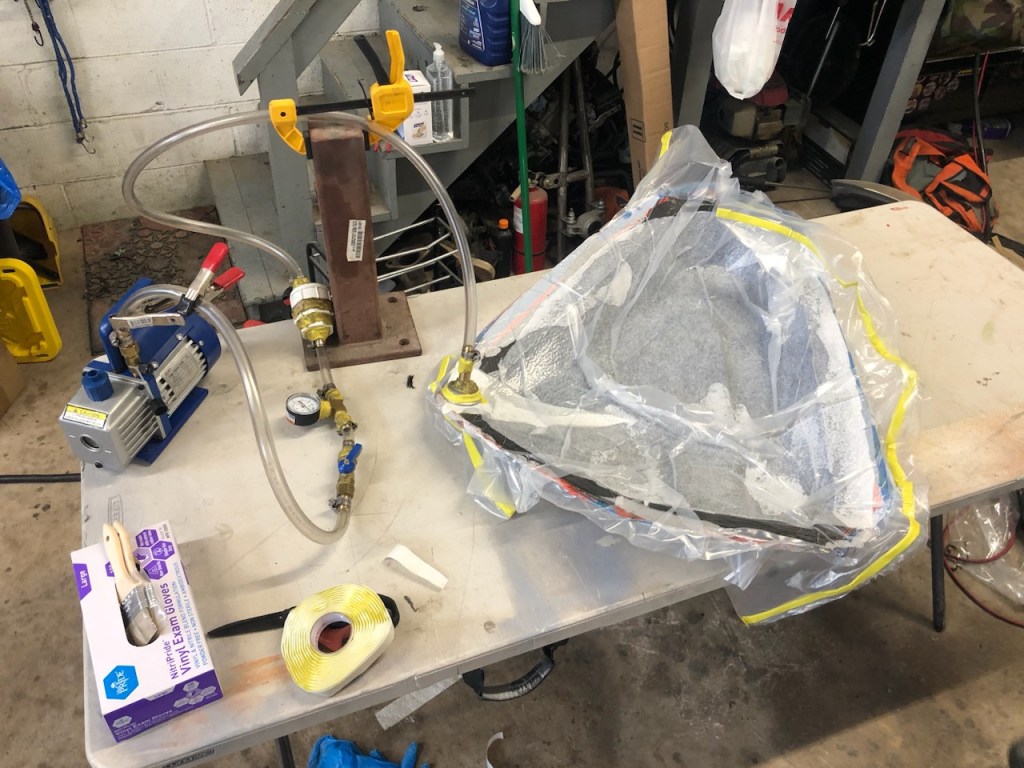
Step 10: Connect the Vacuum System
Connect the vacuum tubing to the vacuum pump and pinch/clamp the resin tubing closed, so the whole system can be checked for leaks. Turn on the vacuum pump to draw the vacuum bag down and once a proper vacuum reading is reached, shut the pump off and check for leaks. The whole system should be able to hold a steady vacuum without the pump having to run consistently. If the pressure reading drops too quickly, it will require spending the time to check for pinholes, loose bagging tape, and loose connections. Ensure that the system can maintain strong vacuum pressure before moving on.
Step 11: Resin Infusion
Once the carbon fiber stack is properly laid up and the vacuum bag is sealed, the infusion process can begin. Mix up the epoxy resin/hardener mixture, place the resin side of the tubing from the part into the resin and unclamp the line. Resin will be drawn into the fiber stack under vacuum pressure, saturating the carbon fibers. When the part has been fully saturated with resin, the resin tubing can be re-clamped, and the system left under vacuum so it can cure into a solid composite part.

Conclusion
Laying up a carbon fiber stack for vacuum infusion is an intricate process that requires precision and care. By following the steps above, you can ensure that each layer of fabric is properly aligned, compacted, and ready to be infused with resin. This careful preparation is key to producing strong, lightweight, and high-quality carbon fiber parts for a wide range of applications.

![[VIDEO] 3D Scanning a CrossKart](https://fabricatorsdomain.com/wp-content/uploads/2025/02/fs-sxms_airbox_thumbnail.png?w=1024)


Leave a comment