
One could argue TIG welding requires more coordination over more traditional MIG welding because it involves using both hands to control your torch and your filler material, while in most-cases also controlling your amperage with a foot pedal. The ideal TIG welding workspace should be set up to give you different ways to orient your project and, most importantly, rest your arms so you can stay comfortable. Your space will likely evolve over time as you gather different random objects to lean on and make your welding life easier, but consider some of the gear and tools below to get started:
Safety
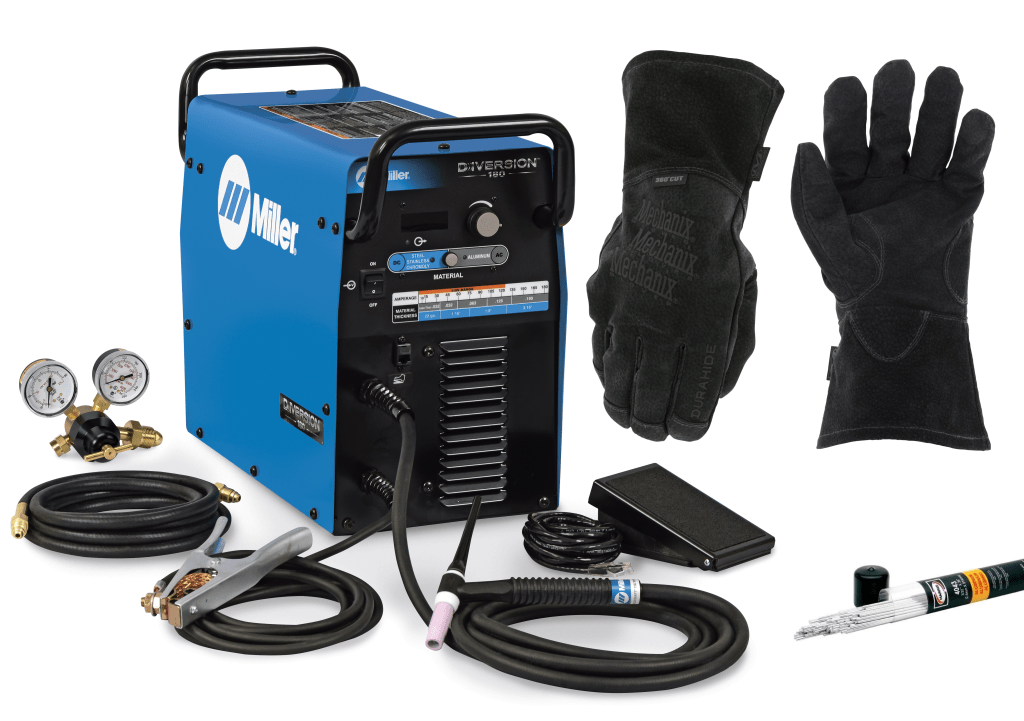
Welding Mask/Helmet: As with MIG, this is probably THE single, most important piece of equipment you’ll use when welding. Not only does it keep your face protected from weld spatter (though this is less of a concern with TIG welding), the lenses will keep you from destroying your vision (or worse, going completely blind!) and for this reason it’s not worth cheaping out on this purchasing – save the money elsewhere if needed, but invest in your safety here. If you prefer a “one shade” option, you can go with a passive helmet, but if you plan to do other forms of welding or even grinding/cutting, an auto-darkening helmet is worth the additional cost.
- Passive Helmet – Passive helmets come with single-shade lenses, so they are not able to be adjusted higher or lower in darkness. These are good options if you are on a tighter budget and/or you are always welding within a small amperage range. Most hobby welding will be done in the Shade 10 range, so a good choice here is the Miller MP-10 Passive Shade 10 Welding Helmet which costs about $50.
- Auto-Darkening – you can go pretty crazy here with pricing, but generally more expensive helmets mean a wider field of vision, quicker reacting/higher number of auto-darkening sensors, additional shade options, and better overall comfort. Helmet options here include:
- Entry-Level : Miller Welding Helmet – Black Classic (~$125)
- Mid-Range: ESAB Sentinel A60 Welding Helmet (~$370)
- High-End: Optrel Helix Quattro Welding Helmet ($575)
TIG Welding Gloves: With TIG welding, you want to be able to have good feeling in your hands since you’ll be using both to weld; one hand will feed filler rod while the other will be precisely controlling the welding torch. The hand sensitivity vs. heat resistance becomes a bit of a trade off with gloves since better feel often comes with thinner materials and thinner materials don’t disperse heat as well. If you’ve ever accidentally grabbed a freshly welded part and felt the pain of heat being trapped in the fingertips of your glove, you can probably understand and appreciate sacrificing some comfort for heat resistance with your welding glove choice.
- Entry-Level: Tillman Goatskin TIG Gloves(<$10)
- Mid-Range: Miller TIG Welding Gloves (~$31)
- High-End: Mechanix Regulator Welding Gloves (~$50)
TIG Finger: Occasionally, you’ll find the most comfortable welding position leaves you resting your hand right on top of your welded material and the TIG Finger makes a world of difference when that piece starts heating up. This handy little fiberglass cloth product slips over a finger two outside of your glove and acts as extra barrier between your hand and your welded material.
- Original TIG Finger (~$15)
Welding Jacket/ Long-Sleeved Shirt: while this might seem obvious to some, a long-sleeved shirt offers protection for your skin in two ways. The first is that TIG welding can occasionally result in a weld popping if the material is dirty or something affects your shielding gas. This can cause weld spatter similar to that of MIG welding, so staying covered up will protect your skin from these rogue hot metal bits. The second reason for protection is to keep your skin shielded from the UV light created by your weld torch. UV rays emitted during the welding process can cause your skin to burn just like a sunburn, so it’s a smart idea to keep yourself covered. A welding jacket is essentially a heavy long-sleeved button-up and it is not far off in price from a standard cotton button-up. Welding jackets are made with fire resistant materials, so they are well worth the investment for the additional fire protection over a standard long-sleeve shirt.
- Welding Shirt: Black Stallion Flame Resistant Work Shirt(~$45)
- Welding Jacket: Miller Indura Cloth Welding Jacket (~$50)
- Welding Sweatshirt: Black Stallion FR Hooded Sweatshirt (~$80)
Tools
Welding Table: a dedicated metal welding table is high in priority on the list of TIG welding needs, even for a simple hobby welder. Having a table with a metal surface allows you to place the ground of your TIG welder onto your table vs. having to ground directly to your part which is a major “quality of life” improvement for anyone TIG welding.
- Entry-Level: Chicago Electric Adjustable Steel Welding Table ($90)
- Mid-Range: Langmuir Systems ArcFlat 2’x3′ ($770 w/ legs)
- High-End: BuildPRO Slotted Welding Table (~$1260)
Copper Backers: this is more of a general type of item, but the idea here is to have copper material (small plates, blocks, etc.) that you can place against the backside of your welds to protect them from contamination and prevent blowing through. Copper has high thermal conductivity, so it takes more effort to heat up and thus it can pull heat away from your welding area more quickly and won’t melt into your welded area. These copper backer plates are placed on the back of your welding area temporarily and removed once finished.
- Various sizes of Multipurpose Copper Sheets/Bars (~$15-50)
Welder Cart: if you’ll need to move your welder around, as is common in welding roll cages, it’s worth investing into a welding cart to be able to move your welding machine and gas tank around more easily. Having to move these items around independently can get old quickly.
- Entry-Level: Chicago Electric 100 lb. Capacity Welding Cart (~$35)
- Mid-Range: Eastwood MIG/TIG/Plasma Welding Cart (~$130)
- High-End: Klutch Heavy-Duty Welding Workstation (~$350)
Chill Blocks: similar to the copper backers above, a “chill block” is a general block of metal (typically aluminum or copper for their high thermal conductivity) that is used to draw heat away from your weld. Because metal conducts heat, chill blocks are used with smaller parts or thinner materials to add more area to your welded part for heat to transfer into. This is important to avoid adding too much heat to your part and accidentally burning the base material away.
- Various sizes of Multipurpose Copper Sheets/Bars (~$15-50)
- Various sizes of Multipurpose Aluminum Sheets/Bars (~$15-50)
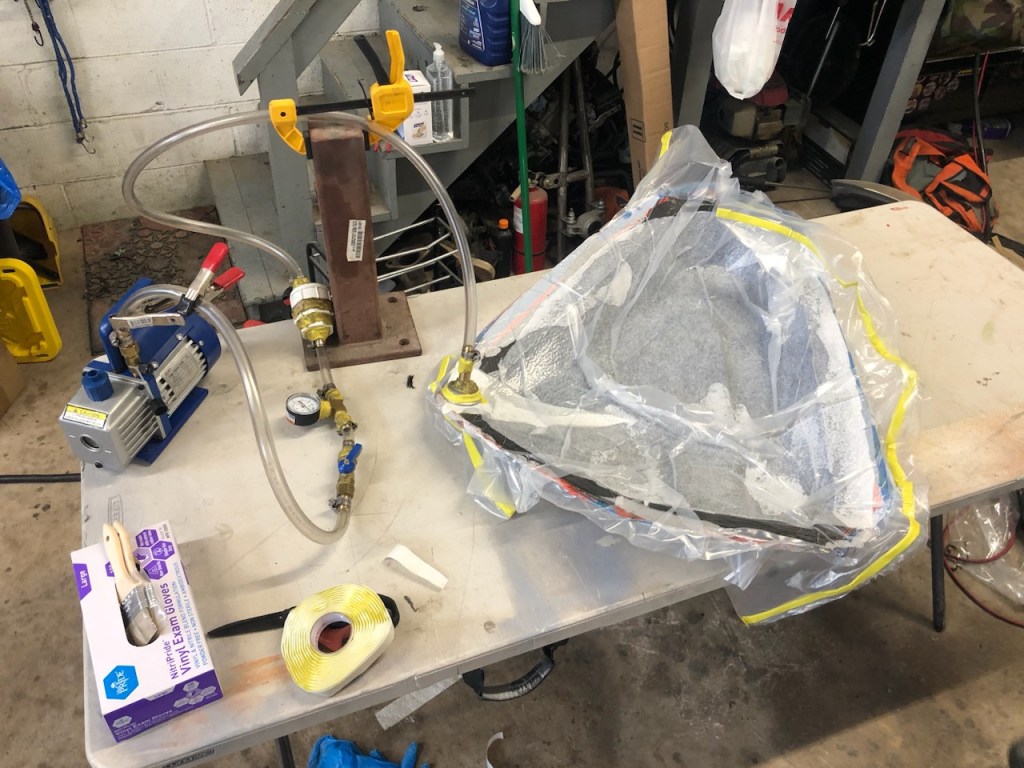
Purge Plugs: if you are planning to quite a bit of steel exhaust welding (or titanium welding) being able to backpurge your weld is crucial to keep the inside of your weld smooth and avoid having a brittle weld. Silicone purge plugs, like the ones linked below, or a “DIY” version using aluminum foil (or even a latex glove!) can be used. The purpose is to contain argon against the backside of your weld to keep it shielded from contamination. Purge plugs are, of course, a larger investment than aluminum foil, but they make backpurge set up a breeze.
Consumables
Tungsten Electrodes: where MIG sends it’s electric arc through welding wire, TIG welders use a tungsten electrode to accomplish that task. There are various types of electrodes depending on material, amperage, and general preference, but the most common is 2% lanthanated tungsten as it is suitable for most scenarios. Having a few different diameters on hand will help as you move back and forth between thicker materials, but 1/16″ up to 1/8″ will be the sweet spot for most hobby automotive welding. Electrodes will have to be ground down as they are used or become contaminated, so a bench grinder or a specific tungsten grinder will be necessary to grind your tungsten down.
- Tungsten Electrode: 2% Lanthanated Tungsten ($15-45)
- Tungsten Grinder: Eastwood Tungsten Grinder ($80)
- Bench Grinder: Bauer 6″ Bench Grinder (~$55)
Filler Rod: With TIG welding, one hand will be managing the welding torch while your other hand will be adding filler metal into your molten weld. The filler material you use should match the materials you are joining together (aluminum with aluminum, stainless steel with stainless steel, etc.) and because automotive mixes all different metals, it’s wise to have various filler types and diameters on hand. As with the Tungsten above, most common filler sizes in automotive applications will range from 1/16″ to 1/8″ diameter. Having these diameters on hand will cover things like intercooler/intake pipes, exhaust, metal ducting, brackets mounted to the frame/firewall, etc.
- Various TIG Welding Rods
Torch Parts: The gas shielding coverage required for your projects will vary as you bounce around between material, thickness, and circumstance. Sometimes you’ll want smaller torch nozzle for tighter spaces (ie. where a tight angle meets up) or you might want wider coverage for a more exotic material (like titanium). To accomplish this change in gas coverage, you’ll have to swap out nozzles, collets, and collet bodies on your TIG torch. There’s no one size fits all answer here, but to find the right application, determine your torch manufacturer and torch style (Miller WP-9 for example) and seek out parts that will fit your specific torch. Generally, each change will require one collet (matching your tungsten diameter), one collet body, and one nozzle, but buying a “nozzle kit” can take away some of the guesswork
Welding Gas: While gas is optional with MIG welding, it is a requirement for TIG welding. Small welding supply companies often offer a gas cylinder exchange service as do larger chains, like Airgas. Either try the old “Welding gas near me” search in Google or find a local Airgas brand using their website’s Dealer Locator to find a place nearby to get gas. For your first tank of gas, be prepared to be a, usually small and one-time, core fee to “rent” a gas cylinder. To properly set up a backpurging application, either get a second gas cylinder (to use specifically for backpurging) or look for a “dual” flowmeter/regulator which will give you two outlets, one for your welder and the other to use for backpurging.
![[VIDEO] 3D Scanning a CrossKart](https://fabricatorsdomain.com/wp-content/uploads/2025/02/fs-sxms_airbox_thumbnail.png?w=1024)


Leave a comment